Do You Know Why Supply and Demand Can Make or Break Your Forex Trades? Mastering these important zones will give you a significant advantage if you are just starting your journey into Forex trading, specifically the Supply and Demand in Forex. They indicate where big players (like banks and institutions) most likely enter or exit their trades. Smart Money Concepts (SMC) combined with this will increase the probability of success dramatically.
Let’s break this down in the simplest way possible, so you not only understand it, but can also apply it.

What is Supply and Demand in Forex Trading?
Supply and demand are the bases of an economy, driven by forces in Forex trading that move the prices of currency. When such concepts are understood, then prices would be possible to be anticipated where they will reverse or still go with the trend.
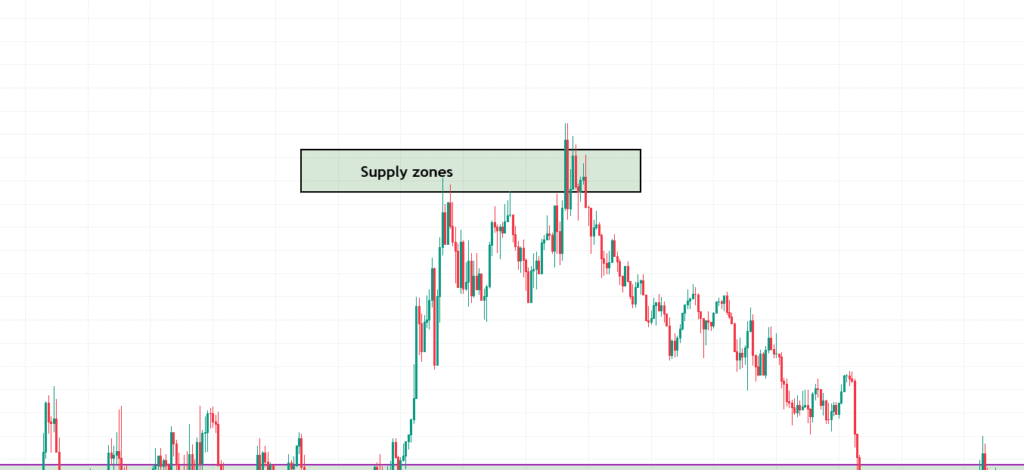
Supply zones are places on your chart where have historically witnessed selling pressure that has overcome buying pressure and have thus led to a dramatic fall in the price. Think of these as resistance levels where institutional traders placed large sell orders. When price returns to these zones, you can expect sellers to step in again.
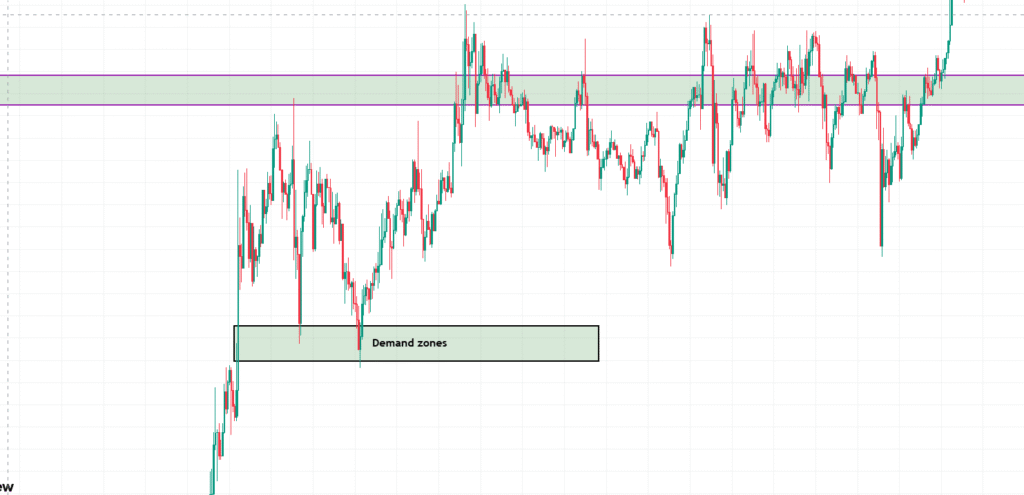
Demand zones, on the other hand, are areas where buying pressure dominates selling pressure, leading to significant price increases. These serve as support levels for positions that smart money typically builds up. Buyers frequently appear in these price ranges to raise prices.
The fact that supply/demand zones and traditional support/resistance zones represent actual areas of institutional order flow is the primary distinction between the two. These areas are populated by major banks, hedge funds, and other institutional players, resulting in powerful price reaction areas.
How to Identify Supply and Demand Zones in Forex
Now you might be wondering, “How do I find these supply and demand zones on my Forex chart?”
Let’s keep it practical:
- Identify Strong Moves: First, look at the chart and find places where the price moved away quickly. A sharp drop or rally usually means something important happened there.
- Look for the Base: The small pause or tight candles right before a big move—this is often where the smart money places orders.
- Mark That Zone: Draw a rectangle from the top to the bottom of that base. That’s your potential supply or demand zone.
- Higher Timeframes Are Key: While you can do this on any timeframe, H1 and above give much more reliable zones.
- Wait for Reaction: Don’t jump in immediately. Keep an eye on the price until it returns to that range.
This method helps you stay ahead of fake breakouts and gives you clear levels to work with, unlike support/resistance, which are often too vague.
Why Supply and Demand Zones are Important for Forex Traders
You might hear new traders say things like “Price is going up, so I’ll just buy.” But without knowing why the price is moving or where it’s likely to reverse, that’s a risky move.
Supply and demand zones:
- Show you where big traders entered the market—you can follow their footprints.
- Help you predict reversals or continuation moves.
- Give you defined areas to place your stop loss and take profit.
- Help you avoid chasing the market.
Traders who consistently win are not the ones who trade more—they’re the ones who wait for prices to come to them, usually in these zones.
Now let’s take things up a notch. When you combine these zones with Smart Money Concepts (SMC), your trading plan becomes much stronger.
Here’s how:
1. Study the Market Structure First
Don’t mark zones blindly. First, look at the trend. Is the market making higher highs and higher lows? That’s bullish. Is it making lower lows? That’s bearish.
2. Spot Liquidity Sweeps
Institutions often push prices above previous highs or below recent lows to trap retail traders. This is where many stop losses get taken out. These fakeouts are usually followed by a strong move in the opposite direction, right from a supply/demand zone.
3. Watch for Break of Structure (BOS)
A BOS happens when the market breaks a previous high/low and changes direction. If a BOS happens near your zone, that’s a strong confirmation.
4. Use Fair Value Gaps (FVG)
These are small gaps on the chart where the price didn’t trade. They often act as magnets. When price fills a Fair Value Gap and touches your zone, the setup becomes even more powerful.
5. Refine Entries with Lower Timeframes
Use a lower timeframe (like M5 or M15) to find precise entries inside the higher timeframe zone. Look for candles with long wicks or mini BOS for entry.
Top Tips for Beginners Using This Strategy
To trade supply and demand like a pro using SMC, follow these tips:
✅ Use Higher Timeframes for Zones
They provide more accuracy. You can drop to lower timeframes for entry, but zones should come from H1 and above.
✅ Wait for Confirmation
Don’t blindly place orders at zones. Wait for a reaction like rejection candles, BOS, or liquidity sweeps.
✅ Keep Your Charts Clean
Avoid cluttering your chart with too many indicators. Focus on price action.
✅ Journal Your Trades
Track what works and what doesn’t. Over time, this builds your confidence and skill.
✅ Don’t Overtrade
Supply and demand zones work best when you’re selective and patient.
Conclusion
Mastering the SMC strategy of supply and demand zones gives a trader a commanding strength in forex trading. Understanding the flow of institutional money through these zones will put a trader in the right position for high probability trades with excellent risk-to-reward ratios.
Winning at trade toward supply and demand zones requires patience to learn and the right risk management. Beginning with the implementation of identifying these zones on charts, he will slowly but surely incorporate several SMC concepts, such as market structure break, liquidity sweeps, etc.
Practice, discipline, and allowing the trading success to come would very surely yield all these. Certainly, this isn’t for all markets: For those who understand its reality, the market rewards, and supply and demand analysis is their door to that knowledge.
FAQs
Can I use supply and demand zones on lower time frames like M15 or M5?
Yes, but higher time frames provide more reliable zones. Use lower time frames for entry confirmation.
What’s the difference between support/resistance and supply/demand?
Support/resistance are horizontal levels based on price history. Supply/demand are zones of imbalance that show where orders are concentrated.
Do I need indicators to trade SMC supply and demand?
No, SMC and supply/demand trading are primarily price-action based. However, tools like FVG and BOS concepts can enhance your accuracy.
How many zones should I mark on one chart?
Keep it simple. Focus on 1-2 high-quality zones in the current price range.