In smart money concepts and institutional trading, the ICT rejection block is one of the most powerful price action tools. Introduced by Inner Circle Trader (ICT), this concept helps traders identify key reversal zones in the market using price inefficiencies and liquidity gaps. Whether you are a beginner in forex trading or someone exploring smart money logic, understanding rejection blocks can dramatically improve your entry and exit accuracy.
A Rejection Block typically marks the origin of price rejection after a strong Break of Structure (BOS).
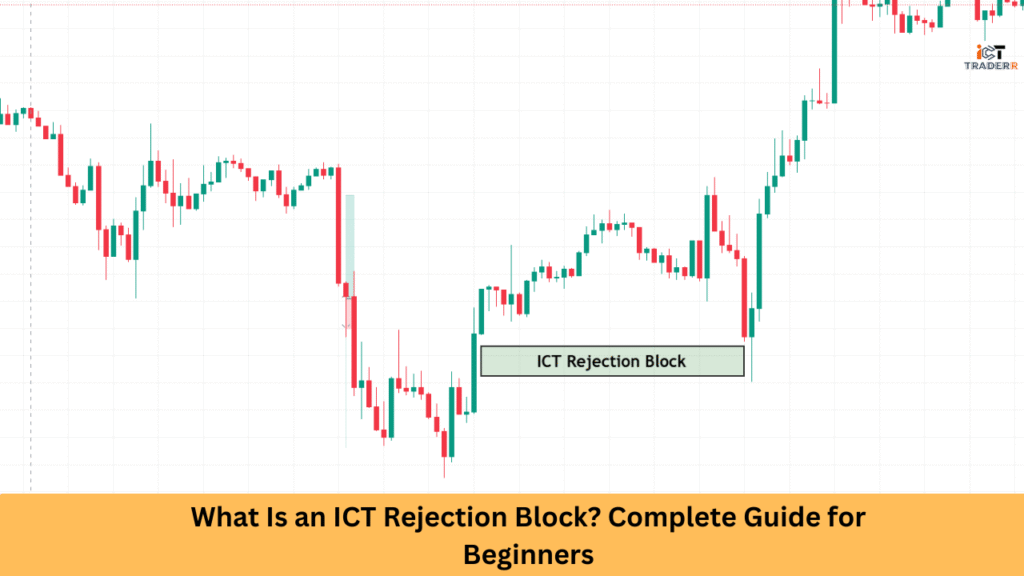
What Is an ICT Rejection Block?
An ICT rejection block is a candlestick formation used to identify potential price reversals or continuations based on institutional order flow. It usually forms when price enters a key level, like a supply/demand zone, and strongly rejects that level, leaving behind a footprint that smart traders can later use for entries.
Think of it as a candle or block where liquidity has been swept (stop-loss hunts), and institutions have made their move. Price then aggressively reverses, indicating smart money participation.
How a Rejection Block Forms (Smart Money Logic)
To understand how a rejection block forms, let’s consider smart money logic. Institutions and large banks don’t trade like retail traders. They use price manipulation to take out retail stop-losses for accumulation of liquidity before they make their major move.
It often overlaps with a Fair Value Gap, enhancing the likelihood of reversal
A rejection block often forms:
- After a liquidity sweep above/below a key high or low
- When a Fair Value Gap aligns with an order block
- When a price rejects a premium/discount zone in the market structure
These rejections act as signals that the big players are in, and price is likely to move in their favor, not retail traders’.
Bullish ICT Rejection Block Explained
A bullish rejection block typically forms at a market bottom or a key support zone. Commonly presented following a false breakout or stop hunt just below a recent low.
Key characteristics:
- Price sweeps the low to gather sell-side liquidity.
- A strong bullish candle closes above the rejection block zone.
- It aligns with discount pricing, suggesting a potential reversal.
This shows that smart money is interested in buying at this level and is rejecting lower prices.
How to Trade a Bullish Rejection Block
To trade a bullish ICT rejection block effectively:
Identify liquidity: Look for equal lows or obvious retail stop zones.
Wait for rejection: Watch for a sweep followed by a strong bullish move.
Mark the rejection block: Highlight the candle when the rejection occurred.
Entry strategy: Enter on a retest of the rejection block (ideally in a discount zone).
Set stop-loss: Below the low of the block.
Take profit: At the next market structure high or FVG.
Combine this setup with market structure shifts and smart money indicators like FVG or breaker blocks for better confirmation.
Bearish ICT Rejection Block Explained
A bearish rejection block is the mirror opposite. It typically appears after price has swept by-side liquidity near a resistance or supply zone.
Key characteristics:
- Price takes out recent highs (liquidity grab).
- A strong bearish candle forms, rejecting higher prices.
- Found at premium pricing zones in the market structure.
This signals that institutions are distributing, and the price is ready to move downward.
How to Trade a Bearish Rejection Block
To trade it effectively:
- Liquidity sweep: Above equal highs or round numbers.
- Wait for the rejection candle: Strong bearish close from a key level.
- Mark the rejection block: Typically, the last up candle before the move down.
- On the retest: When the price comes back to the block zone.
- Place stop-loss: Just above the high of the rejection block.
- Take profit: Next demand zone, FVG, or structure low.
Use this with a bearish market structure, order block confluence, or imbalance zones for added precision.
Best Practices and Mistakes to Avoid
Best Practices:
- Always trade with the trend or after a confirmed market structure break.
- Use confluences: FVG, premium/discount zones, and breaker blocks.
- Combine with timeframe alignment: Confirm on higher timeframes.
- Manage risk with tight stop-losses and proper R: R ratios.
Mistakes to Avoid:
- Don’t trade every rejection block you see—wait for liquidity sweep confirmation.
- Avoid entering without a clear market structure bias.
- Don’t ignore higher timeframe context—rejections can fail against major trends.
Conclusion
The ICT rejection block is a powerful tool in the smart money trader’s arsenal. Whether bullish or bearish, these formations offer excellent risk-reward setups when used correctly. By understanding the logic behind institutional price movements and combining this with key concepts like liquidity grabs, market structure, and FVGs, traders can make smarter, more confident trading decisions.
Mastering rejection blocks takes practice and patience, but once understood, it can change how you see the market forever.
FAQs
Does ICT rejection block mean the same as an order block?
No, though they are related. An order block represents institutional entry; a rejection block shows where the price was rejected, often as a reaction to an order block or liquidity zone.
What timeframes work best for rejection blocks?
They work across all timeframes, but higher timeframes (H1 and above) provide stronger and more reliable setups.
Can I trade rejection blocks in crypto and indices?
Yes, the concept works across all liquid markets, including crypto, indices, and commodities.
Do I need premium tools or indicators for this?
Not necessarily. It needs a good grasp of price action, market structure, and smart money concepts.