In the world of smart money concepts and institutional trading, Mitigation Blocks in ICT (Inner Circle Trader) have become an essential tool for traders seeking accuracy and deeper market understanding. Whether you’re a beginner or an advanced trader, understanding mitigation blocks and how they function can significantly improve your trading strategy.
A Mitigation Block helps to rebalance orders and usually follows a Displacement Move or BOS.
In this article, we will explain everything you need to know from definition to practical use, so you can start using mitigation blocks with confidence.
What Is a Mitigation Block in ICT?
A mitigation block in ICT trading refers to a price level or zone where institutional traders (also known as smart money) have to mitigate or offset previous positions that were left unbalanced during aggressive price movements. In simple terms, it’s where banks and big institutions come back to “clean up” their trades before the price moves in its intended direction.
Mitigation blocks are often confused with order blocks, but they serve a slightly different purpose. While order blocks are the last buying or selling candles before a significant move, mitigation blocks are formed when smart money re-enters the market to correct or manage earlier trade imbalances.
Why Do Mitigation Blocks Form?
Mitigation blocks form due to market inefficiencies. When large institutions execute trades, they do so in massive volumes. This causes rapid price movement, often leaving behind unfilled orders or liquidity voids.
Later, institutions return to these areas to “mitigate” the imbalance and complete their trading intentions. This return creates a block, hence the term mitigation block.
Common reasons for formation:
- To fill unexecuted orders
- To trap retail traders and reverse the price
- To rebalance the supply and demand zones
- To ensure risk management on institutional positions
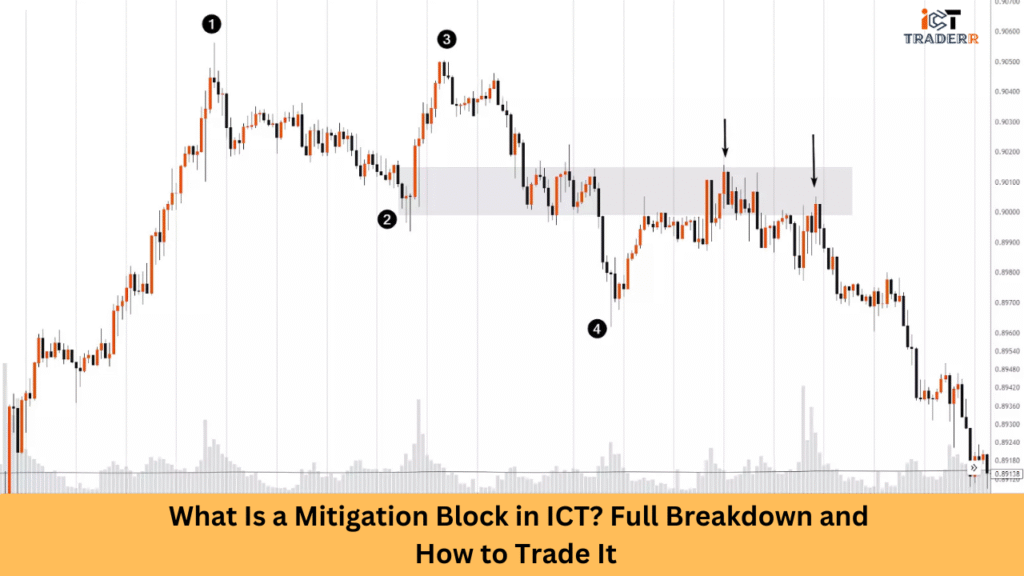
How to Identify a Mitigation Block (Step-by-Step Guide)
Identifying mitigation blocks is an essential skill in smart money trading. Here’s a simple step-by-step guide:
Step 1: Identify a Strong Impulsive Move
Look for a strong bullish or bearish movement that appears to have left a gap or inefficiency in price.
Step 2: Locate the Previous Order Block
Find the original order block that caused the move. Mitigation blocks usually form near or inside the older order blocks.
Step 3: Spot the Return Move
Watch for the price to return to the zone, often in a corrective or consolidating manner.
Step 4: Confirmation with Rejection or Break of Structure
Use candlestick patterns like pin bars or engulfing candles, or wait for a break of market structure confirming the mitigation.
Step 5: Draw the Block
Mark the candle(s) responsible for the mitigation return move. These act as high-probability trading zones.
Bullish Mitigation Block Explained
A bullish mitigation block forms in an uptrend scenario and serves as a buying opportunity for you. Here’s how it typically develops:
- Price makes a strong upward movement, creating buying pressure.
- A brief retracement occurs as the price returns to “mitigate” previous price levels.
- This retracement creates a zone where unfilled buy orders can be executed.
- Once orders are filled, price resumes its upward trajectory with renewed momentum.
Bullish mitigation blocks often form at previous resistance levels that have been broken. When price revisits these levels, what was once resistance now acts as support, confirming the “mitigation” process. Traders look for candlestick formations like hammers, bullish engulfing patterns, or tweezer bottoms at these levels to confirm the completion of mitigation.
These blocks provide lower-risk entry points for traders looking to join an established uptrend, as they offer better risk-to-reward ratios compared to chasing momentum after strong moves.
Bearish Mitigation Block Explained
Bearish mitigation blocks follow similar principles but in downtrend scenarios:
- Price makes a decisive downward movement, establishing selling pressure.
- A temporary pullback occurs as price returns to “mitigate” previous levels.
- This creates a zone where unfilled sell orders can be executed.
- Once completed, the price continues its downward movement.
These blocks typically form at previous support levels that have been broken. When price returns to these levels, former support now acts as resistance, completing the mitigation process. Traders watch for bearish candlestick patterns like shooting stars, hanging man, or bearish engulfing patterns to confirm completion.
Bearish mitigation blocks provide shorting opportunities with defined risk parameters, allowing traders to enter downtrends at optimal price points rather than selling into oversold conditions.
Combine Mitigation Blocks with Order Blocks for high-reliability zones.
Key Differences: Mitigation Block vs Order Block
Although they appear similar, mitigation blocks and order blocks have different purposes and structures.
| Feature | Order Block | Mitigation Block |
| Definition | Last candle before a big move | Return the candle for balancing |
| Purpose | Smart money entry point | Rebalancing previous trades |
| Timing | Comes before the price explosion | Comes after the price explosion |
| Entry Strategy | Initiate positions | Confirm trend continuation |
| Reliability | High for initial trade setups | High for continuation trades |
Understanding the relationship between these concepts helps you develop a more comprehensive market analysis framework. Mitigation blocks often form with existing order blocks, creating a complete picture of institutional activity in the market.
How to Trade Mitigation Blocks
Successfully trading mitigation blocks requires a systematic approach:
Wait for Confirmation: Never enter trades solely based on the presence of a mitigation block. Wait for price action confirmation like candlestick patterns, volume shifts, or momentum changes.
Use Multiple Timeframe Analysis: Identify mitigation blocks on higher time frames, but execute entries based on lower timeframe confirmations for precision.
Apply Proper Risk Management: Place stop losses beyond the mitigation block’s boundaries where the block would be invalidated if the price moved beyond it.
Look for Rejection Signals: Effective mitigation blocks show clear rejection (through wicks, price action, or volume) from the zone once orders are filled.
Combine with Technical Indicators: Use momentum indicators like RSI or MACD to confirm shifts in momentum as price completes the mitigation process.
Track Market Context: Always consider the broader market structure and current phase of the market cycle when trading these blocks.
Consider Market Session Times: Mitigation blocks form more reliably during high-liquidity sessions when institutional traders are most active.
A typical trade setup might involve waiting for price to return to a previously identified mitigation zone, watching for decreased volume during the retracement, and entering when clear rejection signals appear, with targets set at the next significant structure level.
Best Confluences with Mitigation Blocks
Trading becomes more powerful when mitigation blocks align with other technical factors:
- Key Support/Resistance Levels: Mitigation blocks that form at historically significant price levels have higher probability.
- Fibonacci Retracement Levels: Blocks that align with 50%, 61.8%, or 78.6% retracements offer stronger confirmation.
- Fair Value Gaps: When mitigation blocks form within unfilled fair value gaps, the probability of successful trades increases.
- Market Structure Breaks: Blocks that form after key market structure breaks often provide excellent trading opportunities.
- Liquidity Pools: Areas with concentrated stop losses or pending orders enhance the significance of mitigation blocks.
- Daily Open Prices: Mitigation blocks that coincide with daily open prices show institutional interest in those levels.
- Round Numbers: Psychological price levels (like 1.3000 in forex) strengthen mitigation block validity.
- Previous Session High/Low: Blocks forming near previous session extremes indicate important reference points.
When multiple confluences align with a mitigation block, you can increase position size or adjust risk parameters to reflect the higher probability setup.
Conclusion
Mitigation blocks in ICT are critical tools for understanding smart money behavior. By learning to identify and trade them effectively, you align your strategy with institutional moves rather than retail traps. Whether bullish or bearish, mitigation blocks provide excellent entry points for continuation trades when combined with proper market structure and confirmation tools.
As you continue to practice spotting and trading these blocks, you will find your win rate improving and your trades becoming more precise and timely.
FAQs
Are mitigation blocks the same as order blocks?
No, mitigation blocks are formed after a move to balance price, whereas order blocks precede the big move.
Can mitigation blocks be used in any timeframe?
Yes, though higher time frames like H1, H4, or daily offer stronger signals.
Is it necessary to wait for confirmation before trading a mitigation block?
Absolutely. Confirmation protects against false entries and increases trade accuracy.
Do mitigation blocks work in crypto or indices?
Yes, they are based on price action and liquidity concepts, which apply across all markets.
What’s the win rate using mitigation blocks?
Win rates vary, but with proper confluence and risk management, traders can achieve 60-75%+ accuracy over time.